Create a response rule
You create a response rule when you want to be able to group message responses in a meaningful or usable way on a message’s Status page. Once you’ve created a rule it’s then available for users to add to a template or to a new rich message. The rule gets applied as message responses are received.
Open a new blank response rule
- Ensure that the required workspace is on the Workspace toolbar.
- Hover over the workspace to view the Workspace menu.
- Under Messages click New Response rule. (If you can’t see it, click More to view more commands.)
The Response Rule page opens. - Enter a name and description for the rule.
- Go to Enter rule details in the fields.
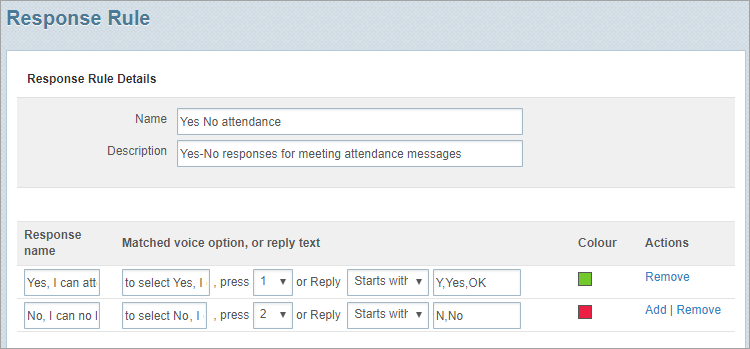
Note: Choose a name that helps explain the rule’s purpose. For example, call the rule ‘Yes No attendance’ if the message responses will be either ‘Yes, I can attend’ or ‘No, I can no longer attend’.
Enter rule details in the fields
You now need to enter the rules for Voice channel responses (if your company has enabled voice message functionality) and text-based responses (such as SMS and email).

- In the field below Response Name enter a name for the first response. For example, ‘Yes, I can attend’.
This will be used in the Message Response view (on the message’s Status page) to categorise the responses. - Click in the next field. It automatically populates with the text that will be read out to a recipient listening to a voice message.
You can edit the text if you need to. - In the field beside ‘press’, enter a keypad option that a person listening to the voice message has to press to select that response.
- In the field beside ‘Reply’, select an option for where to look for response text in a message recipient’s text-based response:
- Starts With: The message recipient’s response must start with specific text.
- Exact Match: The response must exactly match specific text.
- Contains: The response must contain specific text.
- In the next field specify the text that will be accepted. For example, ‘Yes’ or ‘Yes,Y,OK’ separated by a comma and with no spaces. (The text is not case-sensitive.)
- Click the box below Colour to select a colour to allocate to the response.
- Click Add to add another blank rule and repeat Steps 1–6 until you’ve added all expected responses.
- Click Save.
Tip! This is the most commonly used option.