Configure API mappings
Role: Company Administrator.
API Mapping is Whispir’s ‘actions engine’ that runs based on rules. It allows third-party IT systems and applications (such as voicemail, email and SMS messaging services) to push information to Whispir via HTTP requests in order to trigger specified actions. The API mappings that are created on the API Mapping page provide the mechanism that allows an action workflow to be executed. API mappings can be invoked by address mappings (the inbound gateway) and Whispir’s rich messages.
For example, an API mapping could be created to prompt a person to send an SMS message to a particular phone number, which then triggers an event – or perhaps adds the person to a distribution list in Whispir. There’s a wide range of actions available. See What the API Mapping actions do.
Important! If you’re interested in using the API Mapping feature contact the Whispir Support Team (support@whispir.com). It requires technical input and guidance to set up and invoke correctly, particularly for complex workflows.
Note: You can review inbound HTTP requests on the Incoming Request Log page. See View the Incoming Request Log.
Create the mapping
- Open the API Mapping page (click
 > Administration sidebar > API Mapping).
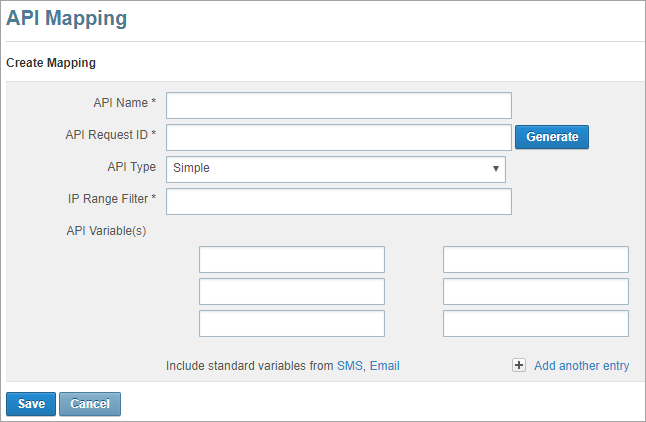
 - In the API Name field enter a short description of what the mapping is for and/or what it does.
As soon as you click in the field additional fields appear below it. - In the API Request ID field enter a unique ID (with no spaces).
This is the identifier that external systems will use to invoke this particular mapping. Therefore it must be unique across all Whispir customers within a Whispir region.
Best practice is to make the ID a short form of the API name so it’s easier to manage in the future. - In the API Type field:
- Select Simple if you want an incoming external request to trigger only a single action. Go to Step 6.
- Select Rule-Based if you want an incoming external request to trigger multiple actions. Go to Step 5.
- In the Execute matched rules field select an option.
- In the IP Range Filter field enter *.*.*.* (which represents an infinite IP range).
A specific IP address or address range is rarely required for this field. - (optional) Enter any relevant variables in the API Variable(s) fields.
These are custom variables that can be included in the body of an SMS message, email or voice message. They’re dynamically populated from the inbound request into an outbound action at send time.- In the left column enter the name of each variable (with no spaces).
- (optional) In the right column enter the default value to be used if no value is provided for the variable in the left column.
- Click Save.
Your new mapping is saved but it won’t appear in the API Mapping List at the bottom of the page until you assign rules to it. - Go to Assign and add rules to the mapping.
Note: If you need access to the API Mapping feature but you can’t see it in the Administration sidebar contact the Whispir Support Team (support@whispir.com).
Tip! You can click Generate to add a unique ID automatically.
Assign and add rules to the mapping
- In the Select API field select the mapping you just saved.
Additional fields appear below it. - Do one of the following:
- If you selected Simple in the API Type field go to Simple API type:.
- If you selected Rule Based in the API Type field go to Rule-based API type:.
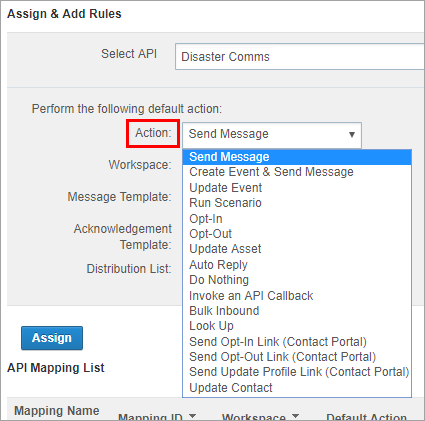
- In the Action field select the type of action that you want to use. The list contains all the standard actions offered by Whispir.
Depending on which action you select, the fields below it may change. - In the Workspace field select the workspace the action will apply to.
- Complete all other relevant fields for your selected action.
- Click Assign.
The API mapping is now set up and it’s listed in the API Mapping List.
Note: For more information about what each action does contact the Whispir Support Team (support@whispir.com).
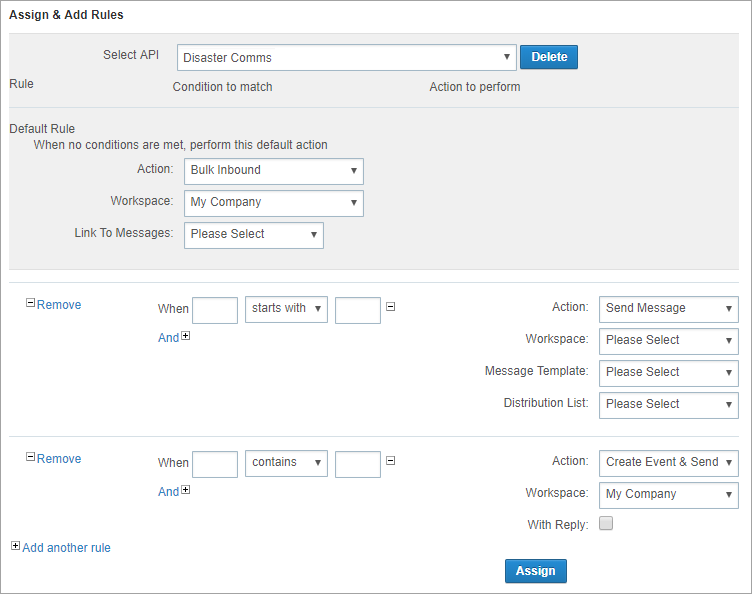
- Set up the required rules for each action, including the default rule.
- For each rule enter additional information in the accompanying fields:
- In the Action field select the type of action that you want to use. The list contains all the standard actions offered by Whispir.
Depending on which action you select, the fields below it may change. - In the Workspace field select the workspace the action will apply to.
- Complete all other relevant fields for your selected action.
- Click Assign.
The API mapping is now set up and it’s listed in the API Mapping List.
Note: If none of the conditional rules is met, the default rule is applied.
Note: For more information about what each action does contact the Whispir Support Team (support@whispir.com).
What the API Mapping actions do
|
Action |
What does it do? |
Comments, known issues, limitations or workarounds |
|---|---|---|
|
Send Message |
Sends a message using a specified template to a specified distribution list (DL) |
Tip! If you don’t want to send a message to a DL but instead want to target a specific recipient:
|
|
Create Event & Send Message |
Used to create an event and then send a message |
Requirements:
If you select the With Reply check box, you can then select the template and the DL to send the message to. Tip! If you don’t want to send the reply message to a DL but instead want to target a specific recipient:
|
|
Update Event |
Used to update an event by setting values on an event object |
Requirements:
|
|
Run Scenario |
Runs a predefined scenario in a given workspace |
A scenario is a combination of a template and a distribution list |
|
Opt-In |
Sends a message to a person, prompting them to reply if they want to be added as a contact to the specified distribution list |
Includes the option to send the person an auto reply message (usually an acknowledgement) using the selected message template |
|
Opt-Out |
Sends a message to a person, prompting them to reply if they want to unsubscribe from the specified distribution list |
Includes the option to send the person an auto reply message (usually an acknowledgement) using the selected message template |
|
Update Asset |
(Don’t use) |
(This action was developed for a specific use case for a specific customer) |
|
Auto-Reply |
When used with an SMS text-in rule, it sends a message (using the selected message template) back to the person who sent an inbound message |
|
|
Do Nothing |
Use it when you want no action to be taken |
This action is typically used when your API mapping is rules-based. For example, you set the default rule’s action to Do Nothing. Then if none of the conditions in your other rules are met, the default rule gets triggered and the action is ‘take no action’ |
|
Invoke an API Callback |
Makes an asynchronous call to an external web API |
Callbacks are used to forward a message response and/or forward information about an undeliverable message to a specified URL. The API callback feature is well documented on our Whispir for Developers site (https://developers.whispir.com/docs/callbacks). See also the online help topic Register a callback URL. It explains how to configure API callback settings in the Whispir platform. You also need to pass the attribute ‘callbackname’ in your apimapping data when you call your API Mapping ID. You can either configure this in the API mapping as a variable, or you can have one API callback apimapping and pass the callbackname value in each submit button. The US region prefers the latter and modifies the submit button properties to provide this configuration on the Content tab |
|
Bulk Inbound |
Note: This action is only used for SMS inbound messages. Use it to attach all inbound SMS messages to a specific, previously sent outbound message |
This action allows any inbound text message that matches the API mapping rule to be attached to a specific message (which can be blank) and appear as a response on the message’s Status page in Whispir. It’s a way to capture all related inbound messages that would not otherwise be processed as responses. When used in conjunction with response rules (instead of an SMS text-in sending an outbound message), it’s a better way to process inbound messages in cases where the number of replies is likely to be very high. For example, an SMS text-in campaign is advertised on national TV. All inbound messages are added as replies to the linked message, and response rules in the message manage the replies |
|
Look Up |
(Don’t use) |
(This action was developed for a specific use case for a specific customer) The action is invoked by an incoming email. A custom Whispir parser then cycles through each workspace to find a specific template and specific distribution list(s) (DLs). If there are matches Whispir sends a message to the DLs using the selected template. For example, a customer has created a workspace for each of their clients. All these workspaces contain a common set of templates that have been rebranded to suit each client. With a single inbound email message, the customer can trigger outbound messages across all the client workspaces. To configure the API mapping you need to enter the following variables and their values:
|
|
Send Opt-In Link (Contact Portal) |
This is an advanced action used in a specific Whispir contact portal workflow. It allows Whispir customers to receive a registration link and become active contacts in the portal |
Contact your account manager or contact the Whispir Support Team (support@whispir.com) for more details
|
|
Send Opt-Out Link (Contact Portal) |
This is an advanced action used in a specific Whispir contact portal workflow. It allows Whispir customers who have subscribed to the portal to opt out of receiving messages and have their profile deleted |
Contact your account manager or contact the Whispir Support Team (support@whispir.com) for more details |
|
Send Update Profile Link (Contact Portal) |
This is an advanced action used in a specific Whispir contact portal workflow. It allows Whispir customers who have subscribed to the portal to receive a link in order to update their contact details |
Contact your account manager or contact the Whispir Support Team (support@whispir.com) for more details |
|
Update Contact |
Use it in conjunction with a rich message. The action triggers updates to values in contact profile fields based on the API variables you add to your API mapping |
The rich message recipients must be contacts in Whispir. You can use the following API variables:
|